

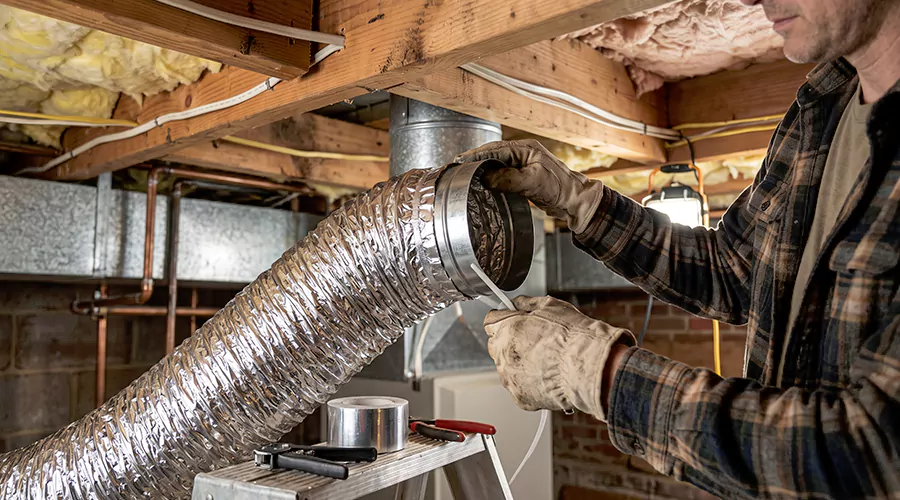
To connect flexible ductwork, fit the inner duct liner over a properly sized connection collar, secure it with an approved mechanical drawband, seal the joint with compatible HVAC mastic, and restore the insulation and outer vapor-barrier jacket. The completed connection should be airtight, mechanically secure, and properly supported so the duct does not pull away or become restricted during operation. Professional custom HVAC ductwork helps ensure these connections fit the system's design and airflow requirements.
Flexible ductwork is commonly used in residential heating and cooling systems because it can follow gentle curves around attic framing and other building obstacles. It often connects rigid metal trunks to ceiling registers, floor vents, return boxes, and distribution plenums. Unlike rigid sheet metal, insulated flexible duct has several layers that must be connected correctly.
Most residential insulated flexible ducts contain an inner air-carrying liner supported by a spiral wire, a surrounding layer of fiberglass insulation, and an exterior protective jacket. The inner liner carries the air, while the insulation limits unwanted heat transfer. The outer jacket protects the insulation and helps control moisture movement.
A connection that holds only the exterior jacket may appear secure but still leak substantial amounts of air. Likewise, a joint sealed with tape but lacking proper mechanical attachment may separate when the duct moves. Understanding how the layers fit together is the first step toward a reliable connection.
What Is Used to Connect Flexible Ductwork?
Flexible HVAC ducts normally connect to a rigid collar or sleeve that matches the duct's intended diameter. The collar provides a stable connection surface for the flexible inner liner. Many collars include a raised bead that helps keep the liner from slipping off after it is secured.
The type of collar depends on the connection. A round takeoff collar may attach to a rectangular metal trunk, while a register boot often arrives with a suitable connection collar already installed. Two flexible duct sections can also be connected using an approved rigid joining sleeve.
Connection materials must be compatible with the specific duct product. Nonmetallic flexible liners commonly use approved drawbands and sealing materials rather than screws driven through the liner. The Air Duct Council advises against using sheet metal screws to attach nonmetallic flexible duct cores because the screws can damage the material.
Materials and Tools for Connecting Flex Duct
| Material or Tool | Purpose |
|---|---|
| Correctly sized flexible duct | Forms the air passage |
| Beaded metal connection collar | Provides a secure attachment surface |
| Approved nylon drawband or specified clamp | Mechanically secures the inner liner |
| Drawband tensioning tool | Tightens the fastener correctly |
| UL 181B-listed duct mastic | Seals applicable flexible duct connections |
| Approved UL 181B closure tape | Seals compatible duct or jacket joints |
| Rigid metal joining sleeve | Connects two flexible duct sections |
| Wide duct support straps | Prevents sagging and connection strain |
| Suitable cutting tools | Prepares duct material and reinforcing wire |
| Measuring tape | Confirms duct diameter and installed length |
| Gloves and eye protection | Reduces handling injuries |
Check the manufacturer's installation instructions before selecting the fasteners and sealant. The required products may vary between nonmetallic and metallic flexible ducts. The correct materials should also satisfy locally adopted mechanical codes.
How Do Flexible Duct Connections Work?
A typical insulated flexible duct connection has three separate parts that must be completed. First, the inner liner is placed over a rigid collar and fastened mechanically. Next, the air-carrying joint is sealed so conditioned air cannot escape.
Finally, the insulation and outer jacket are brought over the connection and sealed appropriately. These exterior layers should cover the joint without being compressed. Gaps in the insulation can create cold spots and contribute to condensation when the system operates in humid conditions.
Each layer serves a different purpose. Tightening a clamp around the outer insulation does not substitute for fastening the inner liner. Similarly, sealing the inner liner does not eliminate the need to protect the insulation and exterior jacket.
How to Connect Flexible Ductwork Step by Step?
The following procedure describes a typical connection for insulated nonmetallic flexible duct used in residential HVAC systems. It follows the general method described by the U.S. Department of Energy's Building America program. Always follow the exact instructions supplied with the duct and connector being installed.
Step 1. Turn Off the HVAC Equipment
Turn off the heating and cooling system before disconnecting or connecting ductwork. Wait for the blower to stop so loose dust or insulation does not move through the open passage. If the work involves the air handler cabinet or electrical components, qualified personnel should follow the manufacturer's required electrical isolation procedures.
Ordinary flexible duct connections must not be confused with furnace combustion exhaust systems. Combustion venting uses different materials and safety requirements. Do not attach residential flexible supply duct to a furnace exhaust flue.
Step 2. Identify the Connection Type
Determine whether the flexible duct will connect to a main trunk, register boot, return box, plenum, or another flexible duct section. Inspect the fitting for damage and confirm that the connection collar is compatible with the duct. A loose or bent collar should be corrected before the liner is installed.
The connection should also match the HVAC design. If the existing collar is too small, forcing a larger duct onto it can create an unwanted restriction. A suitable transition may be necessary when the designed duct diameter differs from the old fitting.
Step 3. Check the Flexible Duct Size
Confirm the duct's nominal diameter and the size of its rigid connection collar. The inner liner should fit the collar according to the product instructions. Avoid estimating dimensions from the exterior jacket because insulation increases the outside diameter.
The required duct size should come from the system's airflow design. ACCA Manual D provides recognized methods for determining residential duct dimensions. A correctly attached duct can still perform poorly if it is too small or routed through excessive bends.
Step 4. Prepare the Duct End
Move the outer jacket and insulation back to expose enough of the inner liner for the connection. Handle the inner liner carefully so the reinforcing wire and surrounding material remain intact. A torn or damaged duct end should be corrected before attachment.
Do not cut the material shorter than required for a secure connection. At the same time, excessive duct length should not be left coiled nearby. The finished run should remain appropriately extended along its intended route.
Step 5. Position the Inner Liner Over the Collar
Slide the inner flexible liner onto the rigid collar until it passes the raised retaining bead as specified by the manufacturer. The Department of Energy's detailed connection guide describes pulling the core at least two inches past the raised bead for the type of beaded collar illustrated. The exact overlap must follow the particular product's instructions.
The liner should remain evenly positioned around the collar. Twisting or bunching the material can create gaps and interfere with the seal. Check that the collar does not have sharp edges capable of cutting the liner.
Step 6. Install the Mechanical Drawband
Place an approved drawband around the inner liner at the position specified for the collar. Tighten it using the appropriate tensioning tool. The goal is to hold the liner firmly against the connection without tearing or excessively deforming the material.
The drawband should engage the connection so the raised bead helps resist separation. A loose fastener can allow the liner to slip off when the duct moves. Excessive tightening can damage the material, so use the correct fastener and method.
Sheet metal screws should not be driven through ordinary nonmetallic flexible liners as an improvised fastening method. The Air Duct Council recommends approved connection products evaluated for the particular duct type.
Step 7. Seal the Inner Connection
Apply compatible HVAC duct mastic over the appropriate joint, following the manufacturer's instructions. The Department of Energy's example method seals across the mechanically secured connection between the liner and collar. The seal should cover the relevant joint rather than merely coat the exposed metal fitting.
Use products approved for the duct material and application. Under UL 181B classifications, flexible duct closure tapes, mastics, and nonmetallic mechanical fasteners have specific listing designations. A product intended for another application should not be assumed suitable because it looks similar.
Allow the sealant to set as directed. The connection should remain secure while the work continues.
Step 8. Restore the Insulation
Bring the duct insulation back over the collar and sealed inner connection. The insulation should meet the adjacent duct or fitting insulation without significant gaps. This helps maintain the intended thermal resistance around the joint.
Avoid tightly compressing the insulation with a narrow strap. Excessive compression reduces its effective thickness. The Department of Energy warns that compressed insulation can create cold spots that may contribute to exterior condensation.
Step 9. Seal the Outer Jacket
Pull the exterior vapor-barrier jacket over the insulated connection. Secure it using approved closure materials as specified by the product. Department of Energy guidance describes using suitable UL 181-approved foil tape and compatible mastic in a typical connection assembly.
The jacket should remain continuous around the connection. A torn or open exterior layer can expose insulation to moisture or damage. Make sure the protective covering remains intact after the duct is positioned.
Step 10. Support the Duct Near the Connection
Install suitable support so the flexible duct does not pull against the collar. A sharp bend immediately after the fitting can restrict airflow and place unnecessary strain on the connection. The duct should extend sufficiently straight from the collar before turning.
Department of Energy guidance recommends additional support near bends and connections. For typical horizontal flexible duct installations, supports should be no more than four feet apart and at least 1.5 inches wide. Manufacturer instructions may require closer spacing.
Step 11. Inspect the Complete Connection
Check that the inner liner is securely attached, the joint has been sealed, and the insulation and exterior jacket are restored. Confirm that the duct remains open without twisting or crushing near the fitting. The connection should not move excessively when the supported duct settles into place.
Inspect any nearby branch connection that may have been disturbed during installation. Moving one flexible run can unintentionally loosen another. Correct problems before closing the work area.
Step 12. Restore Operation and Check Airflow
Restore HVAC operation only after all ducts and equipment panels are secured. Check whether air reaches the intended register without unusual noise. A qualified contractor may measure register airflow or perform duct leakage testing when the work affects a larger network.
Feeling air at the register does not prove the connection is airtight. Leakage testing can identify hidden openings that remain after installation. The completed connection should support the system's intended airflow.
How to Connect Flexible Ductwork to Metal Ductwork?
Flexible ductwork commonly connects to a rigid metal supply trunk through an approved takeoff collar. The collar is mechanically secured to the trunk before the flexible duct is attached. Its connection to the main duct must also be sealed appropriately.
After preparing the collar, expose the flexible inner liner and attach it using the approved drawband method. Seal the inner connection with compatible mastic. Then bring the insulation and exterior jacket over the collar and complete the protective seal.
The trunk and branch should be supported independently where appropriate. A heavy or unsupported flexible branch can pull on the takeoff and cause the entire fitting to loosen.
A correctly installed connection provides a continuous air passage between the rigid metal duct and the flexible branch. The transition should not create a sudden restriction that was not accounted for in the design.
How to Connect Two Flexible Ducts Together?
Two flexible duct sections can be joined using a properly sized rigid metal sleeve or approved connector. The connector should provide suitable attachment surfaces at both ends. Beaded collars help retain the inner liners when the approved fastening method is used.
Step 1. Select the Joining Sleeve
Choose a rigid connector matching the nominal diameter of both flexible ducts. The connector should be approved for the application and provide enough engagement length for secure connections. Both ends should be free from sharp edges and damage.
Step 2. Connect the First Inner Liner
Move the insulation and jacket away from the first duct end. Fit the inner liner onto the rigid sleeve and secure it using a suitable drawband. Seal the air-carrying joint with compatible mastic.
Step 3. Connect the Second Inner Liner
Repeat the procedure for the other flexible duct. The second liner should remain properly seated and mechanically attached. Check that neither end has become twisted or bunched against the connector.
Step 4. Restore the Insulation
Bring the insulation from both duct sections together so it covers the joining sleeve. Avoid leaving a gap that exposes the metal connector. The insulation should retain its intended thickness.
Step 5. Seal the Exterior Jackets
Bring the jackets together and complete the seal using products approved for the material. Inspect the finished splice for gaps and damaged covering. Support the duct so the sleeve does not bear unnecessary weight.
A splice can be useful when extending a duct or replacing part of an existing run. However, it introduces additional connections that must remain airtight. When practical, one continuous appropriately sized run may reduce the number of possible leakage points.
Can You Connect Flexible Ductwork Without a Metal Connector?
A rigid connection collar or approved joining fitting is generally needed to connect ordinary residential insulated flexible ductwork reliably. Simply overlapping two flexible liners and wrapping them with tape does not provide the same mechanical stability.
The connection sleeve maintains the passage shape and provides a surface for properly securing each liner. Without it, the material can deform or separate. The duct manufacturer's approved alternatives should be followed where applicable.
An improvised tape-only connection may appear airtight immediately after installation but become unreliable as the duct moves or the system operates. Proper mechanical attachment is necessary for a durable connection.
How Do You Connect Flexible Ductwork to a Ceiling Vent?
A ceiling register normally attaches to a duct boot positioned above the ceiling opening. The flexible duct connects to a rigid collar on the boot rather than directly to the decorative register cover.
The inner liner is placed over the boot collar, mechanically secured, and sealed. The insulation and exterior jacket are then restored across the connection. The register boot should be supported independently so the flexible duct does not carry its weight.
The boot-to-ceiling gap may also require appropriate sealing. The Department of Energy recommends sealing these penetrations to reduce unintended airflow between the conditioned rooms and surrounding attic space.
A loose boot cannot be corrected simply by applying more tape to the flexible duct. The fitting and its support must also be repaired.
How Do You Connect Flexible Ductwork to a Plenum?
A flexible branch can connect to a supply or return plenum through an approved takeoff collar designed for the plenum material. The collar is installed and sealed to the plenum before the flexible liner is connected. A sheet metal plenum and a fiberglass duct board plenum may require different collar fastening methods.
The connection should match the duct sizing design and be positioned without creating unnecessary airflow restrictions. After the collar is secured, the flexible liner, mechanical fastener, mastic, insulation, and outer jacket are installed in the appropriate sequence.
The plenum should support the connection without being distorted by the duct's weight. An unsupported flexible branch can damage the collar or pull the joint apart.
What Type of Tape Should You Use for Flexible Ductwork?
Closure products should be selected according to the duct material and applicable listing requirements. The Air Duct Council identifies UL 181B classifications for tapes, mastics, and certain nonmetallic fasteners used on flexible duct connections. Product labels and installation instructions should be checked before use.
| Product | Appropriate Role |
|---|---|
| UL 181B-FX-listed tape | Approved flexible duct closure applications |
| UL 181B-M-listed mastic | Applicable flexible duct sealing |
| UL 181B-C-listed nonmetallic fastener | Approved mechanical attachment |
| Specified metallic clamp | Connection where permitted by the product |
| Ordinary cloth-backed household duct tape | Not recommended as permanent HVAC duct sealing |
Tape does not replace the mechanical attachment required by the liner connection. A suitable drawband or specified fastener should hold the liner, while the closure material seals the air pathway.
How Far Apart Should Flexible Duct Supports Be?
Department of Energy Building America guidance recommends horizontal flexible duct supports no more than four feet apart. Supports should generally be at least 1.5 inches wide, with no more than half an inch of sag per foot between supports. Vertical flexible duct sections require suitable support, with typical guidance calling for intervals no greater than six feet.
The correct support arrangement should also protect connections. A branch should not hang from its metal collar or develop a sharp bend immediately after the fitting. Additional support may be needed at turns and changes in elevation.
Manufacturer instructions and local requirements must take precedence if they specify a more restrictive arrangement.
What Are the Most Common Flexible Duct Connection Mistakes?
A flexible duct connection can fail even when the surrounding duct material remains in good condition. Most problems involve incomplete inner-liner fastening, poor sealing, or inadequate support. Some mistakes are hidden by the outer insulation, making careful installation particularly important.
Avoid these problems:
- Securing only the exterior jacket instead of the inner liner.
- Connecting flexible duct without an appropriate rigid collar.
- Using a loose or unsuitable drawband.
- Driving screws through a nonmetallic liner without product approval.
- Applying sealant without mechanically securing the connection.
- Using ordinary cloth-backed duct tape as a permanent seal.
- Leaving insulation pulled away from the metal fitting.
- Compressing insulation with a narrow fastener.
- Leaving the exterior vapor barrier open.
- Allowing the duct to hang from its connection.
- Creating a sharp bend immediately after the collar.
- Joining two flexible ducts without an approved sleeve.
- Using the wrong duct diameter.
- Skipping final leakage or airflow verification when required.
Correct installation should preserve both the mechanical connection and the intended airflow passage. Repairing a failed joint should address the reason it separated rather than merely covering the opening with additional tape.
Can You Connect Flexible Ductwork Yourself?
Some accessible duct repairs may be manageable for experienced homeowners familiar with the approved connection products. However, creating new branches or modifying a major return or supply network requires appropriate sizing and system evaluation. A connection that appears secure can still create significant pressure loss if the duct is incorrectly installed.
Attics and crawlspaces also present access hazards. Work close to an air handler may involve electrical equipment and other mechanical components that require qualified service. A professional installer is generally recommended for major connections and system modifications.
How Can You Keep Flex Duct Connections Secure?
Proper support reduces mechanical stress on the collar and fastener. Avoid moving flexible ducts unnecessarily during attic storage or other maintenance. If a connection is disturbed, inspect the inner liner and protective jacket rather than relying only on the exterior appearance.
Routine HVAC maintenance can include visual inspection of accessible branch connections. Damaged outer jackets and loose supports should be repaired promptly. Moisture affecting the insulation should also be investigated before it causes further deterioration.
Conclusion
Connecting flexible ductwork requires an approved rigid collar, secure inner-liner fastening, suitable air sealing, and properly restored insulation and exterior protection. Joining two flexible ducts requires an appropriate rigid sleeve rather than a tape-only overlap. Correct support and gentle bends help protect the connection and maintain airflow. All products should be compatible with the specific duct system and local requirements. Before closing the work area, inspect the finished joint and confirm that the duct remains securely supported.